After the last set of issues, I needed to consider upgrading the fuel pump. I want as much power out of this car as I can safely get, and if that means upgrading the fuel pump, then that’s what I will do. How hard could it be?
As with most modern vehicles, the fuel pump is located inside the fuel tank. It’s also only one component of an entire assembly called a module. The module consists of the pump, the filter, the sending unit, a pressure relief regulator valve, and a jet pump, whatever the hell that is. The Cruze also uses a returnless system, so there’s no fuel return line going back to the tank from the fuel rail.
The only way to get to the pump module is to drop the fuel tank from under the car. I have seen videos of people who have removed their back seat, taken a hand grinder with a cutoff wheel, and cut a hole in the car’s floor to get to the top of the tank. No offense if you’re one of those people, but that seems like way more work than just dropping the tank, and it leaves a hole that needs to be sealed as well.
Before I yanked anything out of the car, I wanted to get my hands on one of the modules to see if I could take it apart and find out if it would need modifying in any way. I checked eBay, found a used one for $30, and ordered it.
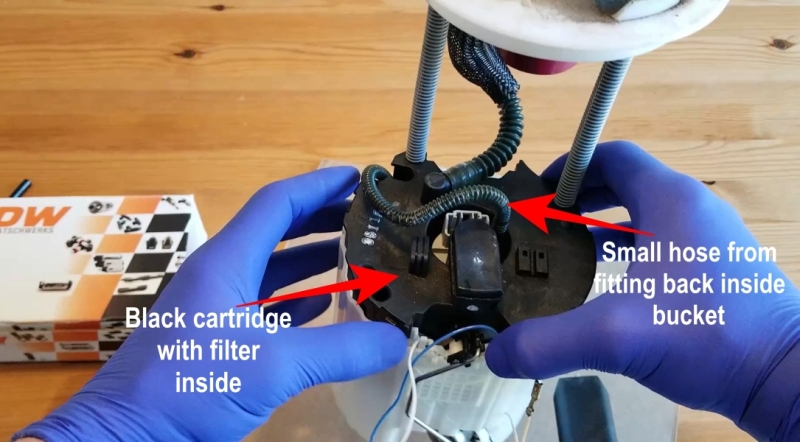
Once I had the pump module in hand, I started to take it apart. The pump was in the middle of a black circular cartridge inside a white bucket. I tried to separate the black cartridge from the bucket, but a small hose attached to a fitting on the pump prevented me from doing that. The small hose went from the top of the pump back down inside the bucket. I had to cut that hose off to separate everything.
Once I had it all apart, I started to figure everything out. The black cartridge was the fuel filter. The pump plugs into the filter cartridge and then snaps inside the bucket. At the bottom of the bucket is the pressure relief regulator valve. There is a small fitting on the bottom of the filter cartridge that plugs into that valve. The sending unit is apparent, leaving only one component unaccounted for, the jet pump. The small hose must be for the jet pump, but what the hell is a jet pump?
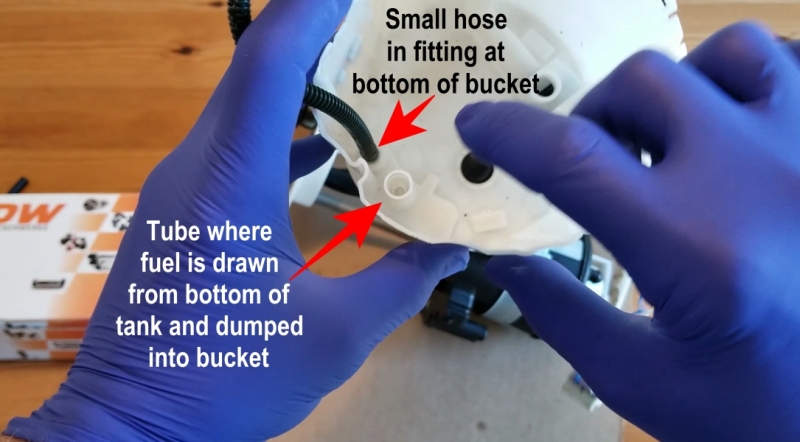
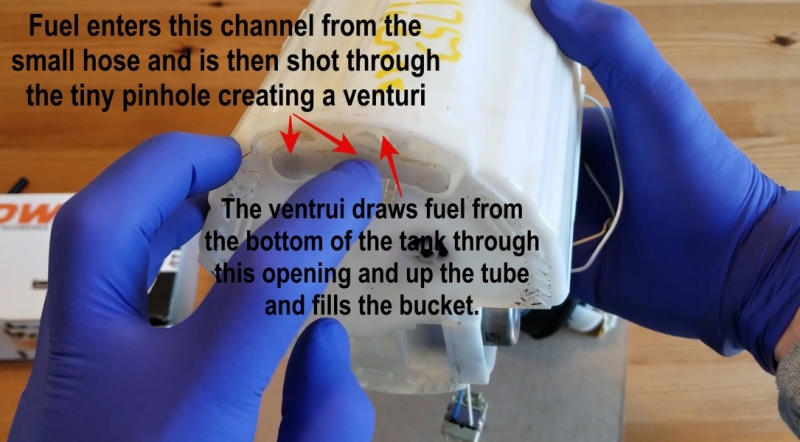
After some research, I discovered what a jet pump is and what it does. I’m unsure if I can explain this well, but here goes. The small fitting on top of the pump sends a small amount of fuel through the small hose into a fitting at the bottom of the bucket. The fuel travels through a chamber in the bottom of the bucket, then back up through a tiny pinhole. There is an open space above the pinhole, then a tube that goes back up to the top of the bucket. When the fuel travels through the pinhole, it comes out in a high-pressure “jet.” The high-pressure jet creates a venturi and draws fuel from the bottom of the tank up through the tube, filling the bucket with fuel. Since the pump is inside the bucket, it now has a nice fuel supply, especially when the tank levels are low or during high corner loads. I included some images that hopefully will show what I’m trying to describe.
Once I saw how it was all put together and how things worked, I didn’t think it would be difficult to change the pump. I just needed to find a pump with the extra little fitting on the top. Well, the thing is, no aftermarket pumps come with that fitting, at least that I could find. So, how could I make this work? My first thought was to add a tee to the main feed tubing, but it was so short I didn’t think I would be able to do it without getting a kink.
DeatschWerks was recommended to me by the tuner as a good brand of fuel system components. I contacted their technical support to talk about some possible options. The guy I spoke with was very helpful and said they usually tap the top of their pumps and add the small fitting, but the size pump that I would need didn’t have enough space on the top for them to do that. He suggested the tee option or converting it to a return-style system. To convert it to a return-style system, I would need to add a pressure regulator, run a hose from the fuel rail back to the tank, and add extra fittings.
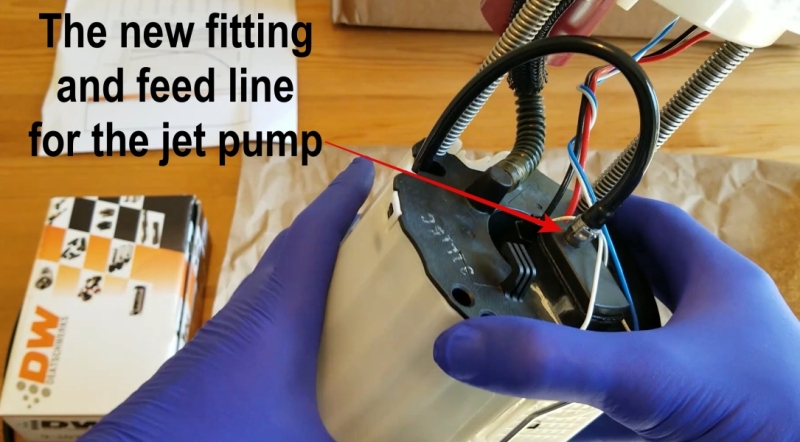
I really didn’t want to add more parts and work to the project, so I decided to figure out a way to make the jet pump work. It’s always a little cloudy up there, but I did some brainstorming. I figured I could tap the top of the filter cartridge where the pump plugs into it and add a fitting there. I could then run a hose from that fitting to the fitting at the bottom of the bucket, and it should work the same as the original setup.
Fortunately, I found a small fitting with male threads and an o-ring that looked like it would work. I also ordered a 340-liter pump from DeatschWerks, DW-300 compact, and started the modification. I carefully drilled the top of the filter cartridge and added the fitting. Next, I attached a small hose to the fitting I had just added and attached the other end of the hose to the fitting at the bottom of the bucket. I clamped both ends of the hose to ensure it was nice and secure. I installed the pump and then reassembled the module.
Now that everything was back together, I needed to find out if it would work before installing it back in the fuel tank. How could I do that? I didn’t have a way to pressurize the module with fuel to see if it would fill the bucket. After looking at DW’s website, I discovered I could send the module to them, and they could test it for me. Perfect! I also found I could have saved myself a lot of time and effort by sending them the module in the first place, and they would have installed the pump and done any modifications for me. Oh well, we live and learn.
After a week or so, the module returned to my doorstep, along with a test report. I opened it up and saw all I needed to see in a small box titled Test Notes at the bottom of the report. It read, “Good setup. Works as intended.” I must say, it was a proud moment. I sat back in my chair with a grin on my face as the crowd cheered in my head. It was actually a standing ovation, anyway, back to reality.
I reinstalled the pump module into the tank and the tank back into the car. I also upgraded the injectors to 72-lb injectors. With everything back in the car, it was time for data logs so the tuner could do his tuning thing. Everything looked great, the injector duty cycle was low, and the car was making more power!
DS


